
目次
- 目次
- はじめに
- tkinterのバージョンを確認する
- Windowを作る
- ラベルやフォントを使う
- ステータスバーに文字などを表示する
- ボタンを作る
- 画像の表示とWidgetのグリッド配置
- Canvasに図形を描く
- メニューバーを作る
- チェックボックスを使う
- 一行のフォームに文字や数値を入力できるようにする
- Frameでウィジェットをグループ化する
- リストボックスを作る
- メニューバーを作る
- スクロールバーを作る
- タイトル付きフレームを作成する
- ファイルダイアログでファイルを選択する
- メッセージボックスを作る
- Widgetにマウスをホバーしたときに、説明文を表示させる
- MatplotlibのグラフをtkinterのWidgetとして埋め込む
- Pythonのその他GUIライブラリ
- 参考資料
- MyEnigma Supporters
はじめに
以前、PythonのGUIフレームワークとして、
PyQtや
kivyを紹介しましたが、
上記のような、外部ライブラリだと
ユーザにそれらのライブラリをインストールをしてもらう必要があるため、
気軽に使えない場合がありました。
PythonにはデフォルトのGUIフレームワークとして
tkinterがあるのですが、
25.1. tkinter — Python interface to Tcl/Tk — Python 3.6.15 documentation
見た目がかなり野暮ったかったので、
Pythonさえインストールしておけば使えるという特徴はあったのですが、
あまり使う気が起きませんでした。
しかし先日、
下記の記事で紹介した通り、
最近のPython3.6.xでは、
tkinterがバージョンアップしており、
tkinterのversion8.0以降はかなりGUIの見栄えが改善され、
各OSにフィットしたものになっています。
そこで今回は
今回はこのtkinterの簡単な使い方について紹介したいと思います。
下記のサンプルコードはすべて書きのGitHubリポジトリ上でも公開しています。
tkinterのバージョンを確認する
tkinterはpythonをインストールしていれば、
デフォルトで利用できます。
現在のtkinterのバージョンを確認するには、
$ python -c "import tkinter;print(tkinter.TkVersion)"
とすることで確認できます。
または、下記のコマンドで
$ python -m tkinter
下記のようなtkinterのサンプルGUIを表示できるので、
そこにtkinterのバージョンが書かれています。
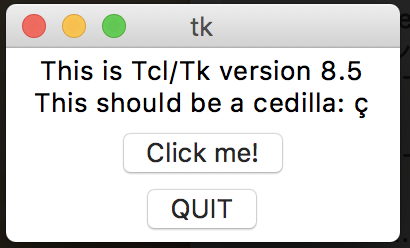
下記のサンプルコードでは、
Python3.6のtkinter8.5のバージョンを利用します。
また、下記のサンプルコードではすべて
import tkinter
していることを仮定しています。
Windowを作る

空のwindowを作る場合は下記のコードでOKです。
root = tkinter.Tk()
root.title("Window title")
root.geometry("400x300+1000+10")
root.mainloop()
Windowのタイトルや
Windowのサイズ(400x300の部分)
Windowの位置(+1000+10の部分)
上記のように設定できます。
ラベルやフォントを使う

ラベルを使って、文字を書いたり、
そのフォントを設定するには、
下記のようにします。
Fontのオブジェクトを作成し、
それをそれぞれのラベルの引数に入れる感じです。
ラベルの文字の色は引数fgで、
背景色はbgで設定できます。
from tkinter import font
root = tkinter.Tk()
root.title("Label")
root.geometry("300x300+1500+10")
label1 = tkinter.Label(root, text="Hallo")
label1.pack(side="top")
font1 = font.Font(family='Helvetica', size=20, weight='bold')
label2 = tkinter.Label(root, text="Bye", bg="blue", font=font1)
label2.pack(side="top")
font2 = font.Font(family='Times', size=40)
label2 = tkinter.Label(root, text="See you", fg="red", font=font2)
label2.pack(side="top")

root.mainloop()
ステータスバーに文字などを表示する

windowの下にステータスバーのように
文字を表示させる場合は
ラベルを作成し、rootに登録します。
root = tkinter.Tk()
root.title("Status bar")
root.geometry("300x300")
status = tkinter.Label(root, text="Now processing..",
                           borderwidth=2, relief="groove")
status.pack(side=tkinter.BOTTOM, fill=tkinter.X)
root.mainloop()
ボタンを作る

Windowの中にボタンを作る場合は、
下記のようなコードにします。
まずtkinter.Frameを継承するクラスを作り、
その中で、tkinter.Buttonのオブジェクトをpackしていくという形です。
dictの"text"にstringを入れると、ボタンのラベルになり、
dictの"command"の関数オブジェクトを渡すと、
ボタンをおした時のコールバック関数になります。
またpackのside引数('left', 'right', 'top', 'bottom')で
ボタンの位置を指定できます。
class Application(tkinter.Frame):

    def __init__(self, master=None):
        super().__init__(master)
        self.pack()
        self.create_widgets()

    def create_widgets(self):
        self.hi_there = tkinter.Button(self)
        self.hi_there["text"] = "Hello World(click me)"
        self.hi_there["command"] = self.say_hi
        self.hi_there.pack(side="top")

        self.quit = tkinter.Button(self, text="QUIT", command=self.master.destroy)
        self.quit.pack(side="bottom")

    def say_hi(self):
        print("hi there, everyone!")

root = tkinter.Tk()
root.geometry("400x300")
app = Application(master=root)
app.mainloop()
画像の表示とWidgetのグリッド配置

画像をtkinterのGUIに表示する場合は、
PhotoImageオブジェクトで画像のパスを指定し、
Labelのimage引数にオブジェクトを渡すだけです。
root = tkinter.Tk()
img = tkinter.PhotoImage(file='./icon.gif')
label1 = tkinter.Label(root, image=img)
label1.grid(row=1, column=1)
label2 = tkinter.Label(root, image=img)
label2.grid(row=1, column=2)
label3 = tkinter.Label(root, image=img)
label3.grid(row=2, column=1)
label4 = tkinter.Label(root, image=img)
label4.grid(row=2, column=2)
root.mainloop()
また、先程はpack関数でwidgetを設置しましたが、
grid関数を使うことで、グリッド上にwidgetを設置できます。
上記のコードでは、2x2に同じ画像を配置しています。
Canvasに図形を描く
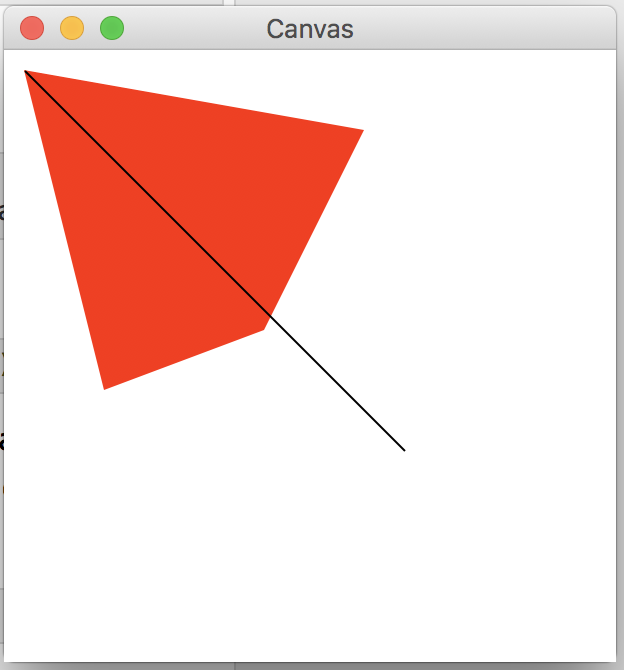
Widgetをキャンバスとして、
線や円、ポリゴンを書くには、
下記のコードのようにCanvasオブジェクトを使います。
座標を指定するだけで、簡単に線やポリゴンを描画できます。
root = tkinter.Tk()
root.title("Canvas")
C = tkinter.Canvas(root, bg="white", height=300, width=300)
C.create_polygon(10, 10, 50, 170, 130, 140, 180, 40, fill="red")
C.create_line(10, 10, 200, 200, fill='black')
C.pack()
root.mainloop()
メニューバーを作る

上記のようにアプリケーションのメニューバーを作りたい場合は、
下記のようにMenuオブジェクトにcommandを
追加していくことで実現できます。
メニューが展開されたときの、セパレーターは
add_separator()で追加でき、
それぞれのメニューは、add_cascadeで
一つのMenuオブジェクトに追加し、
root widgetのmenuに追加する必要があります。
def donothing():
    filewin = tkinter.Toplevel(root)
    button = tkinter.Button(filewin, text="Do nothing button")
    button.pack()

root = tkinter.Tk()
menubar = tkinter.Menu(root)
filemenu = tkinter.Menu(menubar, tearoff=0)
filemenu.add_command(label="New", command=donothing)
filemenu.add_command(label="Open", command=donothing)
filemenu.add_command(label="Save", command=donothing)
filemenu.add_command(label="Save as...", command=donothing)
filemenu.add_command(label="Close", command=donothing)

filemenu.add_separator()

filemenu.add_command(label="Exit", command=root.quit)
menubar.add_cascade(label="File", menu=filemenu)
editmenu = tkinter.Menu(menubar, tearoff=0)
editmenu.add_command(label="Undo", command=donothing)

editmenu.add_separator()

editmenu.add_command(label="Cut", command=donothing)
editmenu.add_command(label="Copy", command=donothing)
editmenu.add_command(label="Paste", command=donothing)
editmenu.add_command(label="Delete", command=donothing)
editmenu.add_command(label="Select All", command=donothing)

menubar.add_cascade(label="Edit", menu=editmenu)
helpmenu = tkinter.Menu(menubar, tearoff=0)
helpmenu.add_command(label="Help Index", command=donothing)
helpmenu.add_command(label="About...", command=donothing)
menubar.add_cascade(label="Help", menu=helpmenu)

root.config(menu=menubar)
root.mainloop()
チェックボックスを使う

チェックボックスを使って、
項目を選択させる場合は、
下記のように実装できます。
root = tkinter.Tk()
CheckVar1 = tkinter.IntVar()
CheckVar2 = tkinter.IntVar()
C1 = tkinter.Checkbutton(root, text="Music", variable=CheckVar1,
                         onvalue=1, offvalue=0, height=5,
                         width=20, )
C2 = tkinter.Checkbutton(root, text="Video", variable=CheckVar2,
                         onvalue=1, offvalue=0, height=5,
                         width=20)
C1.pack()
C2.pack()
root.mainloop()
一行のフォームに文字や数値を入力できるようにする

一行のフォームを作成するには、
下記のようにEntryオブジェクトをpackすればOKです。
bdは枠線の太さを表します。
root = tkinter.Tk()
L1 = tkinter.Label(root, text="Email")
L1.pack(side=tkinter.LEFT)
E1 = tkinter.Entry(root, bd=1)
E1.pack(side=tkinter.RIGHT)
root.mainloop()
Frameでウィジェットをグループ化する

複数のウィジェットをグループに分けたい場合は、
Frameオブジェクトを使います。
下記のコードのように、それぞれのフレームを
rootにpackして、それらのフレームに
widgetを追加することで
widgetをグループ分けできます。
root = tkinter.Tk()
root.title("Frame")
frame = tkinter.Frame(root)
frame.pack()

bottomframe = tkinter.Frame(root)
bottomframe.pack(side=tkinter.BOTTOM)

redbutton = tkinter.Button(frame, text="1")
redbutton.pack(side=tkinter.LEFT)

greenbutton = tkinter.Button(frame, text="2")
greenbutton.pack(side=tkinter.LEFT)

bluebutton = tkinter.Button(frame, text="3")
bluebutton.pack(side=tkinter.LEFT)

blackbutton = tkinter.Button(bottomframe, text="Go")
blackbutton.pack(side=tkinter.BOTTOM)

root.mainloop()
リストボックスを作る

上記のような複数の名前のリストボックスを作る場合は、
下記のようにListboxオブジェクトを使います。
selectmodeを設定することで、複数個選択などを指定できます。
root = tkinter.Tk()
root.title("Listbox")

Lb1 = tkinter.Listbox(root, selectmode=tkinter.MULTIPLE)
Lb1.insert(1, "TOKYO")
Lb1.insert(2, "KYOTO")
Lb1.insert(3, "OSAKA")
Lb1.insert(4, "GUNMA")
Lb1.insert(5, "GIFU")
Lb1.insert(6, "EHIME")
Lb1.pack()

 root.mainloop()
メニューバーを作る
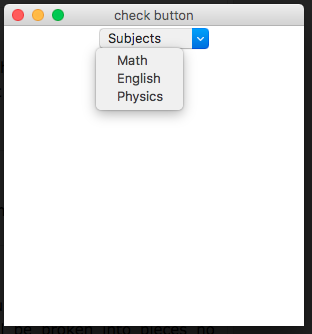
上記の図のような、
クリックするとプルダウンで項目が表示される
メニューバーを作りたい場合は、
下記のようにMenuオブジェクトに、
チェックボタンオブジェクトを追加することで実現できます。
 root = tkinter.Tk()
 root.title("check button")
 root.geometry("300x300")
 mb = tkinter.Menubutton(root, text="Subjects", relief=tkinter.RAISED)
 mb.grid()
 mb.menu = tkinter.Menu(mb, tearoff=0)
 mb["menu"] = mb.menu

 Var1 = tkinter.IntVar()
 Var2 = tkinter.IntVar()
 Var3 = tkinter.IntVar()

 mb.menu.add_checkbutton(label="Math", variable=Var1)
 mb.menu.add_checkbutton(label="English", variable=Var2)
 mb.menu.add_checkbutton(label="Physics", variable=Var3)

 mb.pack()
 root.mainloop()
スクロールバーを作る

スクロールバーを使って、
数値を設定するGUIを作りたい場合は、
下記のように実装できます。
def sel():
    selection = "Value = " + str(var.get())
    label.config(text=selection)

root = tkinter.Tk()
root.title("Scale")
var = tkinter.DoubleVar()
scale = tkinter.Scale(root, variable=var)
scale.pack(anchor=tkinter.CENTER)

button = tkinter.Button(root, text="Get Scale Value", command=sel)
button.pack(anchor=tkinter.CENTER)

label = tkinter.Label(root)
label.pack()

root.mainloop()
タイトル付きフレームを作成する

上記のように、
タイトル付きの複数のフレームを作りたい場合は、
下記のように実装します。
root = tkinter.Tk()

labelframe = tkinter.LabelFrame(root, text="This is a left LabelFrame")
labelframe.pack(side=tkinter.LEFT, fill="both", expand="yes")

left = tkinter.Label(labelframe, text="Inside the left LabelFrame")
left.pack()

labelframe = tkinter.LabelFrame(root, text="This is a right LabelFrame")
labelframe.pack(side=tkinter.RIGHT, fill="both", expand="yes")

right = tkinter.Label(labelframe, text="Inside the right LabelFrame")
right.pack()

root.mainloop()
ファイルダイアログでファイルを選択する
Tkinterを使えば、ファイルダイアログでファイルを選択することもできます。
選択するファイルの拡張子を指定したり、
初期ディレクトリを指定することもできます。
from tkinter import filedialog

typ = [('text file', '*.txt')]
cdir = './'
fle = filedialog.askopenfilename(filetypes=typ, initialdir=cdir)

print(fle)
メッセージボックスを作る


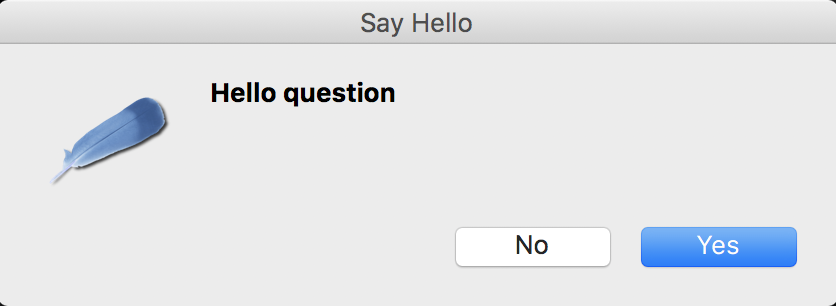


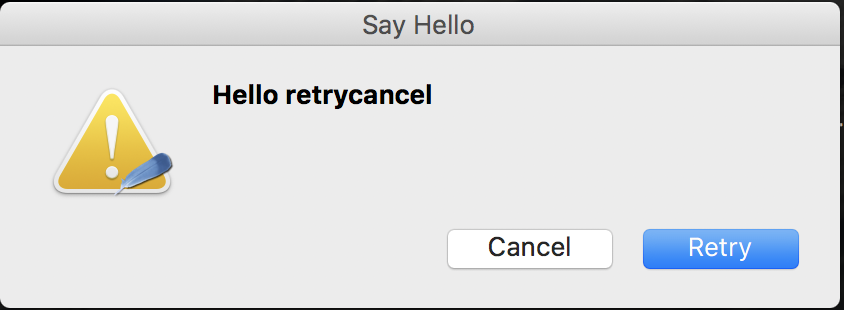
上記のような各種のメッセージボックスを作りたい場合は、
下記のように実装できます。
from tkinter import messagebox

top = tkinter.Tk()
top.title("Message box")

def hello_info():
    messagebox.showinfo("Say Hello", "Hello info")

def hello_warning():
    messagebox.showwarning("Say Hello", "Hello warning")

def hello_error():
    messagebox.showerror("Say Hello", "Hello error")

def hello_question():
    messagebox.askquestion("Say Hello", "Hello question")

def hello_cancel():
    messagebox.askokcancel("Say Hello", "Hello cancel")

def hello_yesno():
    messagebox.askyesno("Say Hello", "Hello yesno")

def hello_retrycancel():
    messagebox.askretrycancel("Say Hello", "Hello retrycancel")

B1 = tkinter.Button(top, text="Hello info", command=hello_info)
B1.pack()
B2 = tkinter.Button(top, text="Hello warning", command=hello_warning)
B2.pack()
B3 = tkinter.Button(top, text="Hello error", command=hello_error)
B3.pack()
B4 = tkinter.Button(top, text="Hello question", command=hello_question)
B4.pack()
B5 = tkinter.Button(top, text="Hello cancel", command=hello_cancel)
B5.pack()
B6 = tkinter.Button(top, text="Hello yesno", command=hello_yesno)
B6.pack()
B7 = tkinter.Button(top, text="Hello retrycancel",
                    command=hello_retrycancel)
B7.pack()

top.mainloop()
Widgetにマウスをホバーしたときに、説明文を表示させる
LabelやEntryにマウスをホバーしたときに、
下記のように説明文を表示させたいときは、
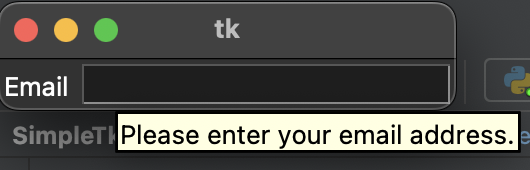
Pythonのデフォルト開発環境である、
idleのこのクラスを使うと簡単に実装できます。
コードとしてはこんな感じです。
import tkinter
from idlelib.tooltip import Hovertip

root = tkinter.Tk()
L1 = tkinter.Label(root, text="Email")
L1.pack(side=tkinter.LEFT)
E1 = tkinter.Entry(root, bd=1)
Hovertip(E1, text="Please enter your email address.")
E1.pack(side=tkinter.RIGHT)
root.mainloop()
ただ、2024年6月でMacでこのコードを動かすと、
ダークモードのときに文字の色が白くなり、
見えなくなるバグがあるので、
そんなときは、下記のようにHovertipクラスをオーバライドして、
showcontents関数のLabelのforegroundを黒文字で指定し、
このクラスを変わりにつかうようにすると
ちゃんと表示されます。
class MyHovertip(Hovertip):
    def showcontents(self):
        label = tkinter.Label(self.tipwindow, text=self.text, justify=tkinter.LEFT,
                      foreground="black", background="#ffffe0", relief=tkinter.SOLID, borderwidth=1)
        label.pack()
MatplotlibのグラフをtkinterのWidgetとして埋め込む


Pythonのグラフ描画ツールであるMatplotlibを
TkinterのWidgetとして埋め込むことも可能です。
import tkinter as tk
import matplotlib.pyplot as plt
from matplotlib.backends.backend_tkagg import FigureCanvasTkAgg

root = tk.Tk()
root.title("Matplotlib embbeded")

fig, ax = plt.subplots()
canvas = FigureCanvasTkAgg(fig, master=root)
canvas.get_tk_widget().grid(column=1, row=0, sticky=(tk.N, tk.S, tk.E, tk.W))
canvas.draw()
root.mainloop()
加えて、グラフのZoomや平行移動など、
MatplotlibのNavigation barも使いたい場合は、
下記のようにします。
import tkinter as tk
import matplotlib.pyplot as plt
from matplotlib.backends.backend_tkagg import FigureCanvasTkAgg
import matplotlib.backends.backend_tkagg as tkagg

root = tk.Tk()
root.title("Matplotlib embbeded")

fig, ax = plt.subplots()
canvas = FigureCanvasTkAgg(fig, master=root)
canvas.draw()
canvas.get_tk_widget().pack(side=tk.TOP, fill=tk.BOTH, expand=1)

canvas_widget = tkagg.NavigationToolbar2Tk(canvas, root)
canvas_widget.draw()
canvas.get_tk_widget().pack(side=tk.TOP, fill=tk.BOTH, expand=1)
root.mainloop()
Pythonのその他GUIライブラリ
Pythonにはtkinter以外にも、
いつかGUIライブラリがあります。
pyqt
kivy
参考資料
http://qiita.com/narupo/items/04e02093f08142fa8f1aqiita.com
https://www.tutorialspoint.com/python3/python_gui_programming.htmwww.tutorialspoint.com
MyEnigma Supporters
もしこの記事が参考になり、
ブログをサポートしたいと思われた方は、
こちらからよろしくお願いします。