目次
- 目次
- はじめに
- インストール
- Windowを作る
- ステータスバーに文字などを表示する
- メニューバーを作る
- ツールバーを作る
- 一行のフォームに文字や数値を表示する
- 複数行のテキストボックスを作る
- 表形式のGUIの作り方
- スライダーGUIを作る
- タブのGUIを作る
- プログレスバーのGUIを作る
- メッセージボックスを作る
- ウィジェットをグループ化する
- リスト選択のGUIを作る
- ラジオボタンを使う
- PyQtをより深く学びたい人は
- Pythonのその他GUIライブラリ
- 参考資料
- MyEnigma Supporters
はじめに
自分はコマンドラインツール好きですが、
たまに簡単なGUIアプリを作りたくなります。
しかし、GUIアプリの場合、
OSとの繋がりが強く、
クロスプラットフォームなGUIアプリを
作ることは難しいと思っていました。
しかし、WindowsやLinux, Macで動くPythonと、
C++GUIフレームワークQtのライブラリPyQtを使うことで
簡単にGUIアプリを作ることができます。
今回はこのPyQtの簡単な使い方について紹介したいと思います。
インストール
各プラットフォームに応じてインストールしましょう。
Macの場合
Homebrewでインストールしましょう
brew install pyqt
Linux(Ubuntu)の場合
ubuntuの場合は、下記のようにapt-getでインストールできるはずです。
sudo apt-get install python-qt4
Windowsの場合
下記のリンク先から、
Pythonのバージョンと、
OSのバージョンによってインストーラをダウンロードし、
インストールすればOKです。
Windowを作る
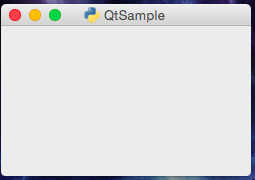
もっとシンプルなサンプルとしては、
下記のコードで、上記のような
ウインドウタイトルのみのWindowを作ることができます。
#!/usr/bin/python
# -*- coding: utf-8 -*-
import sys
from PyQt4 import QtGui

def main():
    app = QtGui.QApplication(sys.argv)
    w = QtGui.QWidget()
    w.resize(250, 150)
    w.setWindowTitle('QtSample')
    w.setWindowIcon(QtGui.QIcon('pythonlogo.png'))  #アプリケーションアイコンを設定 (Pythonのロゴ)
    w.show()
    sys.exit(app.exec_())

if __name__ == '__main__':
    main()
Qtでは、
このウインドウに様々なGUIのWidgetを追加する形で、
GUIツールを作ることができます。
ステータスバーに文字などを表示する
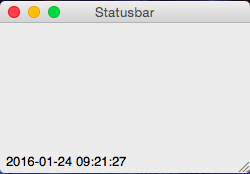
下記のコードの様にQMainWindowのstatusBarメソッドの
showMessage()メソッドを使うことで、
上記のようなウインドウ下の
ステータスメッセージを表示することができます。
#!/usr/bin/python
# -*- coding: utf-8 -*-
import sys
from PyQt4.QtGui import *
from PyQt4.QtCore import *
import datetime

class Example(QMainWindow):
    def __init__(self):
        super(Example, self).__init__()
        self.initUI()

    def initUI(self):
        self.setGeometry(300, 300, 250, 150)
        self.setWindowTitle('Statusbar')
        self.show()

        timer = QTimer(self)
        timer.timeout.connect(self.time_draw)
        timer.start(1000) #msec


    def time_draw(self):
        d = datetime.datetime.today()
        daystr=d.strftime("%Y-%m-%d %H:%M:%S")
        self.statusBar().showMessage(daystr)

def main():
    app = QApplication(sys.argv)
    ex = Example()
    sys.exit(app.exec_())

if __name__ == '__main__':
    main()
上記のサンプルは、
一秒毎にステータスバーに時刻を更新しています。
メニューバーを作る
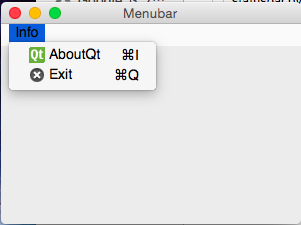
上記のようなメニューバーを作るのも下記のようにできます。
ボタンを押した時の関数は、conectでつなぎ、
ショートカットの設定や、
タブの名前なども追加できます。
#!/usr/bin/python
# -*- coding: utf-8 -*-
import sys
from PyQt4.QtCore import *
from PyQt4.QtGui import *

class Example(QMainWindow):
    def __init__(self):
        super(Example, self).__init__()
        self.initUI()

    def initUI(self):
        exitGUI=QApplication.style().standardIcon(QStyle.SP_TitleBarCloseButton)
        exitAction = QAction(exitGUI, '&Exit', self)
        exitAction.setShortcut('Ctrl+Q')
        exitAction.setStatusTip('Exit application')
        exitAction.triggered.connect(qApp.quit)

        qtInfoGUI=QApplication.style().standardIcon(QStyle.SP_TitleBarMenuButton)
        qtInfoAction = QAction(qtInfoGUI, '&AboutQt', self)
        qtInfoAction.setShortcut('Ctrl+I')
        qtInfoAction.setStatusTip('Show Qt info')
        qtInfoAction.triggered.connect(qApp.aboutQt)

        menubar = self.menuBar()
        fileMenu = menubar.addMenu('&Info')
        fileMenu.addAction(qtInfoAction)
        fileMenu.addAction(exitAction)
        menubar.setNativeMenuBar(False) #for mac

        self.setGeometry(300, 300, 300, 200)
        self.setWindowTitle('Menubar')
        self.show()

def main():
    app = QApplication(sys.argv)
    ex = Example()
    sys.exit(app.exec_())

if __name__ == '__main__':
    main()
ちなみに上記のサンプルコードでは、
Qtのデフォルトアイコンを使っていますが、
使用できるアイコンのリストは下記を参考にしてもらえると良いと思います。
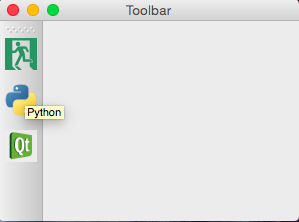
ツールバーを作る
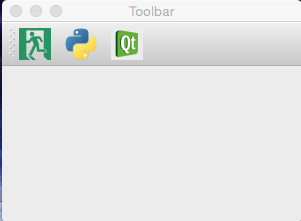
上記のようなアイコンで構成されるツールバーも、
Qtでは簡単に作ることができます。
基本的には先程のメニューバーと一緒でl
Actionと呼出したい関数をconnectし、
addToolbarの返り値のオブジェクトに追加するだけです。
# -*- coding: utf-8 -*-
import sys
from PyQt4 import QtGui
from PyQt4 import QtCore

class Example(QtGui.QMainWindow):

    def __init__(self):
        super(Example, self).__init__()
        self.initUI()


    def initUI(self):
        exitAction = QtGui.QAction(QtGui.QIcon('exit.png'), 'Exit', self)
        exitAction.setShortcut('Ctrl+Q')
        exitAction.triggered.connect(QtGui.qApp.quit)

        pythonAction = QtGui.QAction(QtGui.QIcon('pythonlogo.png'), 'Python', self)
        pythonAction.setShortcut('Ctrl+P')
        pythonAction.triggered.connect(QtGui.qApp.quit)

        qtInfoAction = QtGui.QAction(QtGui.QIcon('qtlogo.png'), 'qtinfo', self)
        qtInfoAction.setShortcut('Ctrl+I')
        qtInfoAction.setStatusTip('Show Qt info')
        qtInfoAction.triggered.connect(QtGui.qApp.aboutQt)

        self.toolbar = self.addToolBar('toolbar')
        self.toolbar.addAction(exitAction)
        self.toolbar.addAction(pythonAction)
        self.toolbar.addAction(qtInfoAction)

        self.setGeometry(300, 300, 300, 200)
        self.setWindowTitle('Toolbar')
        self.show()


def main():
    app = QtGui.QApplication(sys.argv)
    ex = Example()
    sys.exit(app.exec_())

if __name__ == '__main__':
    main()
ちなみに作成されたツールバーは、
左端の模様のある部分をドラッグ&ドロップすると、
下図のように上下左右に移動させることができます。
一行のフォームに文字や数値を表示する
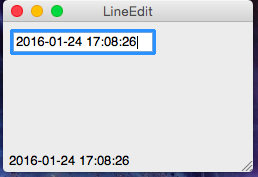
一行のフォームに文字や数値を表示する場合は、
下記のようにQLineEditオブジェクトに、
setTextメソッドで書き込むことができます。
#!/usr/bin/python
# -*- coding: utf-8 -*-
import sys
from PyQt4.QtGui import *
from PyQt4.QtCore import *
import datetime

class Example(QMainWindow):
    def __init__(self):
        super(Example, self).__init__()
        self.initUI()

    def initUI(self):
        self.setGeometry(300, 300, 250, 150)
        self.setWindowTitle('LineEdit')

        self.textbox = QLineEdit(self)
        self.textbox.move(10,10)
        self.textbox.resize(140,20)
        self.show()

        timer = QTimer(self)
        timer.timeout.connect(self.time_draw)
        timer.start(1000) #msec

    def time_draw(self):
        d = datetime.datetime.today()
        daystr=d.strftime("%Y-%m-%d %H:%M:%S")
        self.statusBar().showMessage(daystr)
        self.textbox.setText(daystr)

def main():
    app = QApplication(sys.argv)
    ex = Example()
    sys.exit(app.exec_())

if __name__ == '__main__':
    main()
ちなみに入力された文字列を取得する場合は、
text()メソッドの返り値を利用すればOKです。
複数行のテキストボックスを作る
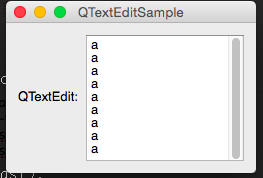

上記のような複数行のテキストボックスは
QTextEditというWidgetを追加することで
実現できます。
setText(str)で、
QTextEdit内に文字を記入でき、
append関数を使うことで、
文字を追記することができます。
QTextEditの中の文字を取得したい場合は、
toPlainText()の返り値を使います。
#!/usr/bin/python
# -*- coding: utf-8 -*-
import sys
from PyQt4.QtGui import *
from PyQt4.QtCore import *

class UI(QMainWindow):
    def __init__(self):
        super(UI, self).__init__()
        self.initUI()

    def initUI(self):
        self.setGeometry(300, 300, 250, 150)
        self.setWindowTitle('QTextEditSample')

        self.w = QWidget()

        label = QLabel('QTextEdit:')
        self.text = QTextEdit(self)
        hbox =QHBoxLayout()
        hbox.addWidget(label)
        hbox.addWidget(self.text)

        self.w.setLayout(hbox)
        self.setCentralWidget(self.w)

        self.timer = QTimer()
        QObject.connect(self.timer,SIGNAL("timeout()"),self.countup)
        self.timer.start(1000)

        self.show()

    def countup(self):
        self.text.append("a")

def main():
    app = QApplication(sys.argv)
    ui = UI()
    sys.exit(app.exec_())

if __name__ == '__main__':
    main()
表形式のGUIの作り方
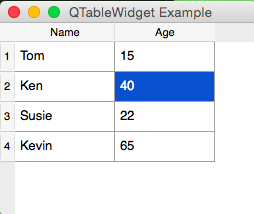
下記のようにTableWidgetを使えば、
簡単に表形式のGUIを作ることができます。
from PyQt4.QtGui import *
from PyQt4.QtCore import *
import sys

def main():
    app = QApplication(sys.argv)
    table = QTableWidget()
    tableItem = QTableWidgetItem()

    # initiate table
    table.setWindowTitle("QTableWidget Example")
    table.setRowCount(4)
    table.setColumnCount(2)

    horzHeaders=QStringList();
    horzHeaders << "Name" << "Age";
    table.setHorizontalHeaderLabels( horzHeaders );

    # set data
    table.setItem(0,0, QTableWidgetItem("Tom"))
    table.setItem(0,1, QTableWidgetItem("15"))
    table.setItem(1,0, QTableWidgetItem("Ken"))
    table.setItem(1,1, QTableWidgetItem("40"))
    table.setItem(2,0, QTableWidgetItem("Susie"))
    table.setItem(2,1, QTableWidgetItem("22"))
    table.setItem(3,0, QTableWidgetItem("Kevin"))
    table.setItem(3,1, QTableWidgetItem("65"))

    # show table
    table.show()
    return app.exec_()

if __name__ == '__main__':
    main()
スライダーGUIを作る
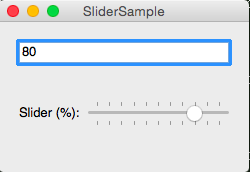
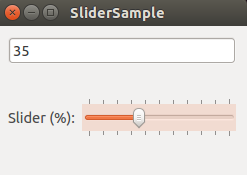
スライドバーGUIも下記のサンプルコードのように、
QSliderクラスを使うことで簡単に実現できます。
下記のコードでは、
スライダのvaluCangedのシグナルを受け取って、
スライダの値をLineEditに表示するようになっています。
from PyQt4.QtGui import *
from PyQt4.QtCore import *
import sys

class App(QMainWindow):

    def main(self):
        self.w = QWidget()
        self.w.resize(250, 150)
        self.w.setWindowTitle('SliderSample')

        slider_label = QLabel('Slider (%):')
        self.slider = QSlider(Qt.Horizontal)  # スライダの向き
        self.slider.setRange(0, 100)  # スライダの範囲
        self.slider.setValue(20)  # 初期値
        #スライダの目盛りを両方に出す
        self.slider.setTickPosition(QSlider.TicksBothSides)
        self.connect(self.slider, SIGNAL('valueChanged(int)'), self.on_draw)

        hbox = QHBoxLayout()
        hbox.addWidget(slider_label)
        hbox.setAlignment(slider_label, Qt.AlignVCenter)
        hbox.addWidget(self.slider)
        hbox.setAlignment(self.slider, Qt.AlignVCenter)

        self.textbox = QLineEdit()

        vbox = QVBoxLayout()
        vbox.addWidget(self.textbox)
        vbox.addLayout(hbox)
        self.w.setLayout(vbox)
        self.w.show()

    def on_draw(self):
        self.textbox.setText(str(self.slider.value()))

if __name__ == '__main__':
    app = QApplication(sys.argv)
    mainApp = App()
    mainApp.main()
    app.exec_()
タブのGUIを作る


上記のようなTabのUIを作りたい場合は、
QTabWidgetクラスに、
それぞれのタブ用のQWidgetを追加するだけです。
# -*- coding: utf-8 -*-
import sys
from PyQt4 import QtGui

class Tab1Widget(QtGui.QWidget):
    def __init__(self, parent=None):
        super(Tab1Widget, self).__init__()
        closeBtn = QtGui.QPushButton('Close')
        closeBtn.clicked.connect(parent.close)
        hbox = QtGui.QHBoxLayout()
        hbox.addWidget(closeBtn)
        self.setLayout(hbox)

class Tab2Widget(QtGui.QWidget):
    def __init__(self, parent=None):
        super(Tab2Widget, self).__init__()
        closeBtn = QtGui.QPushButton('Close')
        closeBtn.clicked.connect(parent.close)
        closeBtn2 = QtGui.QPushButton('Close2')
        closeBtn.clicked.connect(parent.close)
        hbox = QtGui.QHBoxLayout()
        hbox.addWidget(closeBtn)
        hbox.addWidget(closeBtn2)
        self.setLayout(hbox)

class UI(QtGui.QWidget):
    def __init__(self):
        super(UI, self).__init__()
        self.initUI()

    def initUI(self):
        qtab = QtGui.QTabWidget()
        qtab.addTab(Tab1Widget(parent=self), 'Tab1')
        qtab.addTab(Tab2Widget(parent=self), 'Tab2')

        hbox = QtGui.QHBoxLayout()
        hbox.addWidget(qtab)

        self.setLayout(hbox)

        self.setGeometry(300, 300, 250, 150)
        self.setWindowTitle('Tab Layout')
        self.show()

def main():
    app = QtGui.QApplication(sys.argv)
    ui = UI()
    sys.exit(app.exec_())

if __name__ == '__main__':
    main()
プログレスバーのGUIを作る
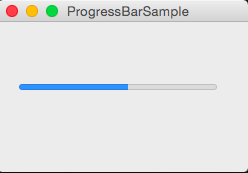

処理の状況を表示するプログレスバーは、
下記のようにQProgressBarオブジェクトを作り、
SetValueで値を設定すればOKです。
上記のようにMacでは細い線でプログレスバーが表示されますが、
Ubuntuでは、プログレスバーの割合も表示されています。
#!/usr/bin/python
# -*- coding: utf-8 -*-
import sys
from PyQt4 import QtGui
from PyQt4 import QtCore

value=0
bar=None

def countup():
    global value
    global bar
    if value<=100:
        value+=5
        bar.setValue(value)

def main():
    app = QtGui.QApplication(sys.argv)
    w = QtGui.QWidget()
    w.resize(250, 150)
    w.setWindowTitle('ProgressBarSample')

    # Create progressBar.
    global bar
    bar = QtGui.QProgressBar(w)
    bar.resize(200,30)
    bar.setValue(0)
    bar.move(20,50)

    timer = QtCore.QTimer()
    QtCore.QObject.connect(timer,QtCore.SIGNAL("timeout()"), countup)
    timer.start(1000)

    w.show()
    sys.exit(app.exec_())

if __name__ == '__main__':
    main()
メッセージボックスを作る
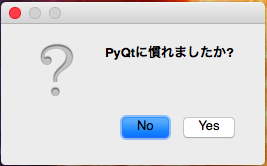

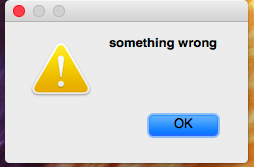

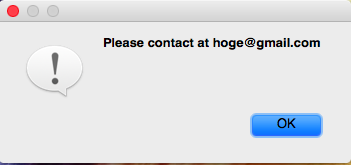


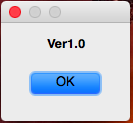
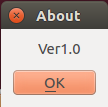
上記のようなメッセージボックスを表示させたい場合は、
QMessageBoxクラスを使います。
質問ボックスや、Warningメッセージなど、
メッセージの種類によってメソッドを変える必要があります。
二つ目の引数はメッセージボックスのタイトルなのですが、
上記のスクリーンショットのように、
Ubuntuでは問題なく表示されましたが、
Macでは上手く表示されませんでした。
ちなみにquestionメソッドの最後の引数は、
デフォルトで選ばれている選択肢を指定するものです。
#!/usr/bin/python
# -*- coding: utf-8 -*-
import sys
from PyQt4.QtCore import *
from PyQt4.QtGui import *

class UI(QMainWindow):
    def __init__(self):
        super(UI, self).__init__()
        self.initUI()

    def initUI(self):

        # message box
        result = QMessageBox.question(self, 'Message', u"PyQtに慣れましたか?", QMessageBox.Yes | QMessageBox.No, QMessageBox.No)

        if result == QMessageBox.Yes:
            print 'Selected Yes.'
        else:
            print 'Selected No.'

        # Warning Message box
        QMessageBox.warning(self, "Message", u"something wrong")

        # Information Message box
        QMessageBox.information(self, "Message", "Please contact at hoge@gmail.com")

        # Error Message box
        QMessageBox.critical(self, "Message", "Oh my god.")

        # About box
        QMessageBox.about(self, "About", "Ver1.0")

        self.show()


def main():
    app = QApplication(sys.argv)
    ui = UI()
    sys.exit(app.exec_())

if __name__ == '__main__':
    main()
ウィジェットをグループ化する
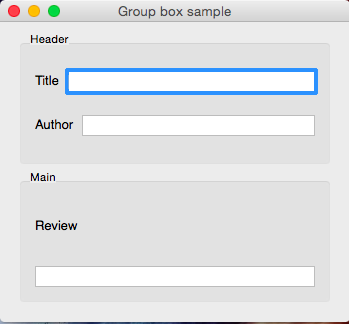
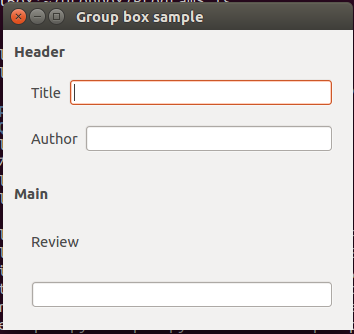
上記のように
複数のウィジェットをグループにまとめたい場合は
下記のようにQGroupBoxにLayoutを追加し、
ウィジェットとして追加することで、
複数のウィジェットをまとめることができます。
#!/usr/bin/python
# -*- coding: utf-8 -*-
import sys
from PyQt4 import QtGui

class Example(QtGui.QWidget):
    def __init__(self):
        super(Example, self).__init__()
        self.initUI()

    def initUI(self):
        title = QtGui.QLabel('Title')
        author = QtGui.QLabel('Author')
        review = QtGui.QLabel('Review')

        titleEdit = QtGui.QLineEdit()
        authorEdit = QtGui.QLineEdit()
        reviewEdit = QtGui.QLineEdit()

        grid = QtGui.QVBoxLayout()

        self.groupBox = QtGui.QGroupBox("Header")
        orivbox = QtGui.QVBoxLayout()

        layout1 = QtGui.QHBoxLayout()
        layout1.addWidget(title)
        layout1.addWidget(titleEdit)

        layout2 = QtGui.QHBoxLayout()
        layout2.addWidget(author)
        layout2.addWidget(authorEdit)

        orivbox.addLayout(layout1)
        orivbox.addLayout(layout2)

        self.groupBox.setLayout(orivbox)
        grid.addWidget(self.groupBox)

        self.groupBox2 = QtGui.QGroupBox("Main")
        mainbox = QtGui.QVBoxLayout()
        mainbox.addWidget(review)
        mainbox.addWidget(reviewEdit)
        self.groupBox2.setLayout(mainbox)
        grid.addWidget(self.groupBox2)

        self.setLayout(grid)
        self.setGeometry(300, 300, 350, 300)
        self.setWindowTitle('Group box sample')
        self.show()

def main():
    app = QtGui.QApplication(sys.argv)
    ex = Example()
    sys.exit(app.exec_())

if __name__ == '__main__':
    main()
リスト選択のGUIを作る


上記のようなリスト選択のGUIを作る場合は、
QComboBoxクラスのWidgetを使います。
addItemでアイテムを追加することで、
リストを作ることができます。
ちなみに選択されたitemは、
currentText()で選択されたitemの文字列を、
currentIndex()で選択されたitemのインデックスを取得できます。
#!/usr/bin/python
# -*- coding: utf-8 -*-
import sys
from PyQt4.QtGui import *
from PyQt4.QtCore import *

class UI(QMainWindow):
    def __init__(self):
        super(UI, self).__init__()
        self.initUI()

    def initUI(self):
        self.setGeometry(300, 300, 250, 150)
        self.setWindowTitle('QComboboxSample')

        self.combo = QComboBox(self)
        self.combo.addItem("A")
        self.combo.addItem("B")
        self.combo.addItem("C")

        self.show()

def main():
    app = QApplication(sys.argv)
    ui = UI()
    sys.exit(app.exec_())

if __name__ == '__main__':
    main()
ラジオボタンを使う
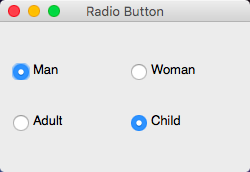
いくつかの選択肢の中から、
一つを選んで欲しい場合は、
ラジオボタンを使うと便利です。
Qtの場合は、QRaditoButtonクラスのオブジェクトを使うことで、
冒頭の図のようにラジオボタンを配置することができます。
いくつかの選択肢のグループの中で、
それぞれ一つの選択肢を選んで欲しい場合は、
それぞれのオブジェクトを下記のように、
QButtonGroupでまとめることで、
ラジオボタンのグループを作ることができます。
例えば下記のサンプルでは、
ManとWomanが一つのグループなので、
どちらか一つしか選べないようになっているはずです。
ちなみにあるチェックボックスがチェックされているかを
確認したい場合は、isCheckedメソッドの返り値を見ればOKです。
#!/usr/bin/python
# -*- coding: utf-8 -*-
import sys
from PyQt4.QtGui import *
from PyQt4.QtCore import *
import datetime

class Example(QMainWindow):
    def __init__(self):
        super(Example, self).__init__()
        self.initUI()

    def initUI(self):
        self.setGeometry(300, 300, 250, 150)
        self.setWindowTitle('Radio Button')

        self.w = QWidget()

        vbox =QVBoxLayout()

        hbox =QHBoxLayout()
        self.b11=QRadioButton("Man")
        self.b12=QRadioButton("Woman")
        self.bg1=QButtonGroup()
        self.bg1.addButton(self.b11)
        self.bg1.addButton(self.b12)
        hbox.addWidget(self.b11)
        hbox.addWidget(self.b12)

        hbox2 =QHBoxLayout()
        self.b21=QRadioButton("Adult")
        self.b22=QRadioButton("Child")
        self.bg2=QButtonGroup()
        self.bg2.addButton(self.b21)
        self.bg2.addButton(self.b22)
        hbox2.addWidget(self.b21)
        hbox2.addWidget(self.b22)

        vbox.addLayout(hbox)
        vbox.addLayout(hbox2)
        self.w.setLayout(vbox)
        self.setCentralWidget(self.w)

        self.show()

def main():
    app = QApplication(sys.argv)
    ex = Example()
    sys.exit(app.exec_())

if __name__ == '__main__':
    main()
PyQtをより深く学びたい人は
下記の本がおすすめです。
また、どうしても解決できない問題などが
ある場合は下記のようなQ&Aサイトで質問してみると、
かなりの確率で回答がもらえると思います。
自分も上記のサンプルコードを作る上で、
何回か質問させてもらいましたが、
その日の内に返信をもらうことができました。
Pythonのその他GUIライブラリ
PythonでGUIライブラリを使いたい場合は、
PyQt以外にも、
- Matplotlib (グラフ作成ツールですが、ちょっとしたGUIも作れます)
- tkinter (PythonのデフォルトGUIライブラリです)
- kivy (iOSなどでも使えるマルチプラットフォームGUIライブラリです)
などがあります。
参考資料
MyEnigma Supporters
もしこの記事が参考になり、
ブログをサポートしたいと思われた方は、
こちらからよろしくお願いします。
